Frame fixings are designed to connect pressed metal door or window frame and the wall. This prevents the frames from being pulled against the substrate and offer a long-lasting fixing of the frame. To maintain strength overtime, the long shaft of metal frame fixing provides rigidity and extra grip strength. Metal frame fixings are recommended for applications such as window frames, door frames, and squared timbers. It is also compatible to a variety of building materials such as concrete, bricks, and others. A frame anchor attaches a door or window frame to the surrounding structure. Frame anchor is ideal for applications that are involved with wooden door or window frames. It is installed through drilling a hole through the frame and into the base material. The screw can be removed or reinstalled when necessary. This frame anchor can withstand heavier frames as it is made of a sturdy metal.
Hollow wall anchors are used for thin or hollow walls like drywall, plasterboard, or other board materials that cannot support heavy weights. They function through biting into the board or wall and expand within its cavity for it to be secured. Generally, hollow wall anchors are to be used on works where ordinary screws cannot be reliable at. The strength of the anchor depends on the size of its expansion
To install hollow wall anchors, one way is to use a hammer to tap it into wall until it is flat or even with the surface. Using a screwdriver, turn the screw clockwise until tight. This will expand the wings behind the drywall. Next, unscrew the screw from the hollow wall drive anchor. Lastly, insert the screw through the object you need to fasten and screw clockwise into the anchor until a resistance is felt.
Another method to install hollow wall anchor is to use the setting tool. Firstly, makes sure that there is enough space in the cavity to inset the anchor so it can expand. Drill a hole slightly smaller than the anchor. Insert the anchor and give it a light tap. Insert the nose piece of the tool between the flat collar and underside of the screw.
Hit anchors are made to anchor into concrete, brick, or block. They are typically recommended for attaching items that weight 50 pounds or less to solid masonry materials. This includes works in the garage, fireplaces, interior walls, among many others. The hit anchor comes with a nail that creates an expansion of the anchor in the solid masonry material it is intended to attach to. The need for a hammer to hit the nail is where hit anchor owes its name to. It is absolutely easy to complete hit anchor installation. The first step is to use a hammer drill with a tipped drill bit to drill a hole in the base material that is ¼” deeper than the wanted setting of the hit anchor. Clean out the debris in the created hole. Insert the anchor through the hole in the fixture and the hole in the base material. Hit the nail using a hammer into the hit anchor until the head is level to the top of the anchor. Remember that hit anchors are best suited for light duty fastening.
Sleeve anchors are incredibly versatile that you can use it in a wide variety of applications. These are also designed to be used in light to heavy duty fastening. When the bolt of the fastener is tightened, expansion occurs in the base material that creates a strong grasp and would allow distribution of load bearing weight. As mentioned, these anchors are very adaptable. They can be used in a plethora of applications as simple as those at the home or for much larger operations. These can also be beneficial for projects that has base materials such as concrete, brick, and block. Installing a sleeve anchor is simple but critical at the same time because correct installation is what would define its efficiency. The first step to install it is to drill a hole, make sure to clean the debris. Install the anchor afterwards and finish it with a hammer and torque wrench.
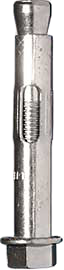
A wedge anchor is a mechanical type expansion. Wedge anchors are to be installed in solid concrete only and is not designed to be used for other materials such as bricks and hollow blocks. Among the mechanical type expansion anchors, wedge anchors have the highest value in consistency and quality. A wedge anchor has four parts. Its parts include the threaded anchor body, the expansion clip, a nut, and a washer.
Wedge anchors owe their holding values to its expansion against the base material. Upon inserting the hole to the concrete, expansion is created. Through turning the nut clockwise, the anchor body is pulled up to the nut.
When using wedge anchors, it is critical to note the distance between wedge anchors and the distance from an unsupported edge of the concrete. “Generally, the spacing requirements used in several industries are that the anchors should be spaced a minimum of 10 anchor diameters away from each other and a minimum of 5 anchors from an unsupported edge of the concrete.”
Dynabolt is made by Ramset in Australia and has became one of the most popular expanding anchor bolts. It has been designed to be an all-purpose all steel medium duty through fixing for masonry and concrete. It is called through fixing which means that you can position any item where you want it to be placed. For example, a timber frame, just drill through it and into the masonry and insert the bolt without moving the frame. This feature of Dynabolts saves you from the usual hassle in attaching something including positioning, marking the wall, and moving the frame while you drill.
Dynabolts are designed for fixing to concrete, solid, and hollow brick, masonry, and natural stone. There is a variety of applications Dynabolts can be efficient at including timber to concrete fixing, ductworks, pipe brackets, signs, and a lot more. However, one of the drawbacks its users find is that it is quite difficult to remove once the need to arises.